CloudTools Configuration

Install CloudTools

Click the button below to view the AppExchange listing and install CloudTools (requires Salesforce administrator permissions).

Create a Connected App for External Access

Step 1 – Launch the App Manager
  1. Login to your Salesforce org using an administrator or other account with sufficient permissions to create and manage connected apps. 
  2. Click the Gear icon  in the upper right corner and select the Setup option. If you do not see this option, contact your Salesforce administrator for assistance.
  3. In the Search box on the left, begin typing the phrase “app manager” (without quotation marks). This will display a list of potential options.
  4. Click the App Manager link to launch the Lightning Experience App Manager.
Step 2 – Create An App
  1. From the Lightning Experience App Manager default view screen, click the New Connected App button in the upper right corner (below the main tab menu). 
  2. Fill out the basic information for your connected app:
    • Connected App Name: Give your app a unique name.
    • API Name: Salesforce will auto-populate this based on your app name.
    • Contact Email: Enter the email address of the app’s administrator.
    • Logo: Choose a sample logo (optional)
  3. Scroll down to the OAuth Settings section:
    • Callback URL: This is the URL where Salesforce redirects after authorization. This value will not be used in the flow required by CloudTools, so you may enter the following placeholder value: https://login.salesforce.com/services/oauth2/success
    • Selected OAuth Scopes: Choose the OAuth scopes required for your app. At a minimum, the following scopes should be selected:
      • Access Analytics REST API resources (wave_api)
      • Access Connect REST API resources (chatter_api)
      • Access Interaction API resources (interaction_api)
      • Access all Data Cloud API resources (cdp_api)
      • Access chatbot services (chatbot_api)
      • Access the Salesforce API Platform (sfap_api)
      • Access the identity URL service (id, profile, email, address, phone
      • Access unique user identifiers (openid)
      • Manage Data Cloud Ingestion API data (cdp_ingest_api)
      • Manage Data Cloud profile data (cdp_profile_api)
      • Manage Pardot services (pardot_api)
      • Manage user data via APIs (api)
      • Perform requests at any time (refresh_token, offline_access)
    • NOTE: Some scopes may not be available based on license type and enabled features. Additional Scopes may be required for add-on products (Service Cloud, Revenue Cloude (CPQ), Public Sector Cloud, etc.).
    • Require Proof Key for Code Exchange (PKCE) Extension for Supported Authorization Flows: Uncheck this box.
    • Require Secret for Web Server Flow: Check this box.
    • Require Secret for Refresh Token Flow: Check this box.
    • Enable Client Credentials Flow: Check this box. This will launch a confirmation dialog. Click OK to proceed.
  4. Click the Save button to create your new app. A screen will appear with a warning message about the length of time required for the new app to be provisioned. Click Continue to proceed.
Step 3 – Set App Permissions
  1. From the list of connected apps, click the down arrow to the right of your new app entry and select Manage from the menu options.
  2. Click the Edit Policies button.
  3. Scroll down to the Client Credentials Section. Using the search utility (magnifying glass icon), search for and select a user account  under which all operations performed by the connected app will run. Depending upon the level of access the selected account has been assigned, certain CloudTools  operations may fail to function (for example, creating or updating records and objects). Consult with your Salesforce administrator if you encounter any difficulties with specific operations so they can assign the necessary account access.
  4. If your org has the Enforce login IP ranges on every request setting enabled, it may be necessary to change the IP Relaxtion policy setting to “Relax IP Restrictions” in order to allow inbound connections. Refer to the official documentation for more information.
  5. Click the Save button to apply your changes.
Screen Captures

Create or Update a Subscription

Once the connected app has been created, open a new tab and find the Apptigent CloudTools link in the App Launcher. 
When the CloudTools configuration page loads it will automatically check the status of your subscription. If no subscription exists, you will receive a Warning dialog with the message “No active subscription found for this org” and the fields in the configuration form will be blank except for Customer Name, Subscription ID, and Domain.
To create a new subscription, click the Submit button. Salesforce will communicate with our licensing system and generate a new Trial subscription record for your org. Follow the same procedure for a pre-paid or pay-by-invoice subscription (we will adjust the Trial status for you manually). 

Switch back to the browser tab with the Connected App details. View the app details and click the Manage Consumer Details button. NOTE: If you have a popup blocker enabled in your browser, after clicking the button you may see a dialog requesting permission to open a new tab. If this occurs, click the Open button to proceed.

If multi-factor authentication (MFA) or two-factor authentication (2FA) is enabled in your org, you will be prompted to provide an authorization code via whatever method(s) your administrator has configured. Enter the code and click the Verify button to proceed.

If the Consumer Key and/or Consumer Secret values are empty or you wish to replace them, click the Generate button to create new values (you may be prompted for MFA/2FA authentication again), then click the Apply button to store the results.

Copy the Consumer Key value and paste it into the Consumer Key field in the CloudTools configuration form. Repeat this process for the Consumer Secret value. Then enter a contact email address in the Contact Email field.

If the submission is successful, a success message will display and the License Key field will be populated with your unique key value. This is also known as an API Key and will be used when configuring connections in external systems such as SAP, Power Platform, Nintex, IBM BPM, and others. NOTE: If you are connecting to Salesforce via CloudTools from a custom app, instruct the app developers to set the License Key value in the “X-Apptigent-Id” header in each request. When your trial expires, external connections vial CloudTools will cease to function. Return to this page and click the Buy Now button to purchase a subscription plan or reach out to use via our contact page and we will help you secure a full license. Should you require any assistance during the configuration process, open a support ticket from our help page and we will be happy to assist you.

Connectors

Microsoft Power Platform

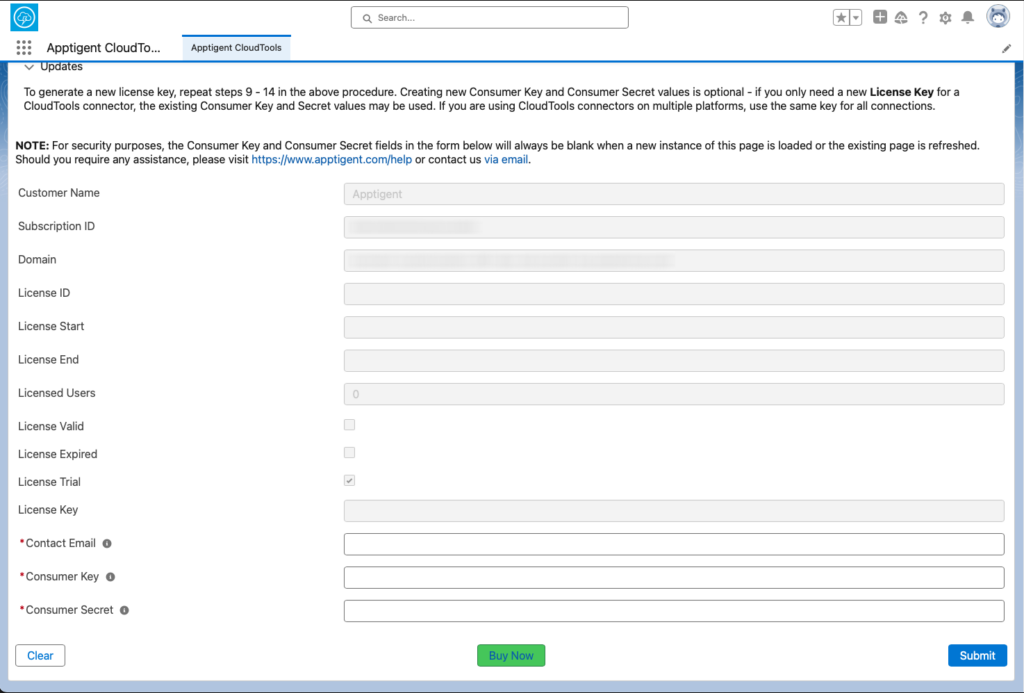
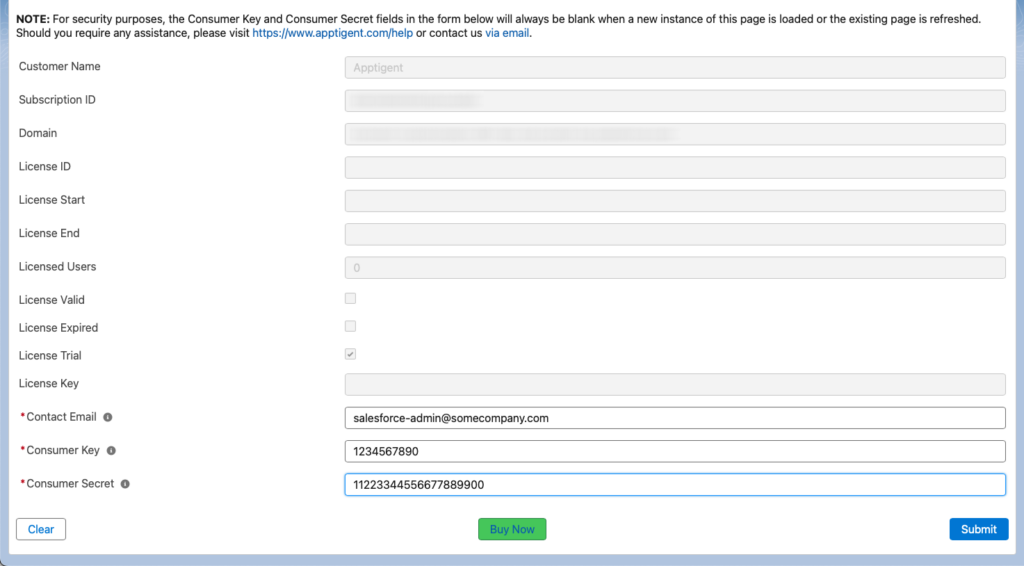
Search for CloudTools from any flow in Power Automate or Azure Logic Apps or from the Connectors tab in Power Apps, then supply the License Key found on the Apptigent CloudTools configuration page in Salesforce for the API Key value when creating a new connection. If you wish to deploy CloudTools as a custom connector in Power Platform, use the links below to download a compatible specification file.

Nintex Automation Cloud

Import the specification file as a custom extension in Nintex Automation Cloud. Use the License Key found on the Apptigent CloudTools configuration page in Salesforce for the API Key value when configuring a new connection. For previous versions of a connector file, visit the CloudTools Release Notes page.

IBM BPM, SAP, Appian, and Other Platforms

Import the specification file as an Open API extension into your desired platform. You can also use any of the described endpoints with any tool, platform, or custom application that supports RESTful HTTP operations. Use the License Key found on the Apptigent CloudTools configuration page in Salesforce for the API Key value when configuring a new connection. For previous versions, visit the CloudTools Release Notes page.

Should you require any assistance enabling CloudTools on your desired platform, please contact support so we can assist you further.


CloudTools for Salesforce Sales Cloud

Version 1.0.0

Download Connector